Requirements
- Proxmox VE 8.2.4+
- CPU with VT-d support (IOMMU)
- Drive(s) you want to pass through
Download the bootloader image
The most popular bootloader right now is Arc (community-maintained). Download the latest release from:
https://github.com/AuxXxilium/arc/releases
Download the .img.zip file for the model you want to emulate (DS923+, DS1522+, etc.).
# Upload to Proxmox and extract
unzip arc-*.img.zip
Create the VM on Proxmox
Step 1: Upload the image to Proxmox
scp arc.img root@proxmox:/var/lib/vz/images/
Step 2: Create the VM
Create a VM with these settings:
- OS: Do not use any media
- System: q35, OVMF (UEFI), add EFI disk
- CPU: host type (to pass through CPU flags)
- Memory: 4 GB+
- Network: VirtIO
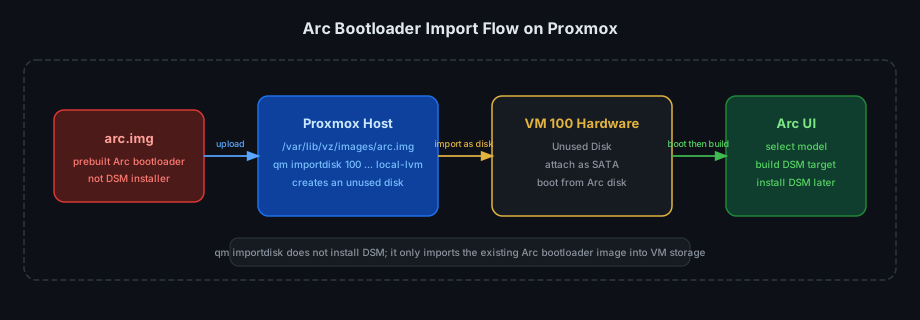
Important detail: arc.img here is a prebuilt Arc bootloader image, not the DSM installer itself. The qm importdisk command only imports that image into local-lvm so Proxmox can expose it as a disk that you later attach to the VM.
# Import the existing arc.img file into VM 100 storage as a disk
qm importdisk 100 /var/lib/vz/images/arc.img local-lvm
In practical terms, this step is:
- Upload
arc.imgto the Proxmox host - Import
arc.imgas anunused diskfor the VM - Attach that disk to the VM over SATA
- Boot the VM from that bootloader disk
DSM installation only happens later, after you open the Arc UI and build the DSM boot target for the Synology model you want to emulate.
Step 3: Attach the disk
In the Hardware tab, select the unused disk → Edit → set bus to SATA, not VirtIO.
HDD passthrough
Enable IOMMU
Edit /etc/default/grub:
GRUB_CMDLINE_LINUX_DEFAULT="quiet intel_iommu=on iommu=pt"
update-grub
reboot
Find the disk ID
ls -la /dev/disk/by-id/ | grep -v part
Pass the disk through to the VM
# Add /dev/sdb to VM 100
qm set 100 -sata1 /dev/disk/by-id/ata-WDC_WD40EFRX-XXXXXXXX
Installing DSM
- Boot the VM, open the Arc bootloader UI at
http://<vm-ip>:7681 - Choose a model (DS923+), select DSM 7.2.1
- Build & Boot
- Open
http://<vm-ip>:5000to complete the DSM installation
Reading SMART data via passthrough
Because the HDD is passed through directly, DSM can read SMART data natively:
Storage Manager → HDD/SSD → select the drive → Health Info
You will see full SMART attributes exactly as you would on a bare-metal server.