A very real problem: you have the machine, but you cannot publish it
Many people have an old PC, mini PC, or spare laptop at home and want to turn it into a mini server for:
- A personal dashboard
- n8n, Gitea, or Vaultwarden
- A self-hosted web app
- A homelab admin panel
- Home Assistant or internal tools
The problem is that the machine exists, Docker works, and the app runs fine on the LAN, but you still cannot expose it to the Internet because:
- Your ISP blocks inbound ports
- You are behind CGNAT
- The apartment router does not allow port forwarding
- You are on a shared network with no NAT control
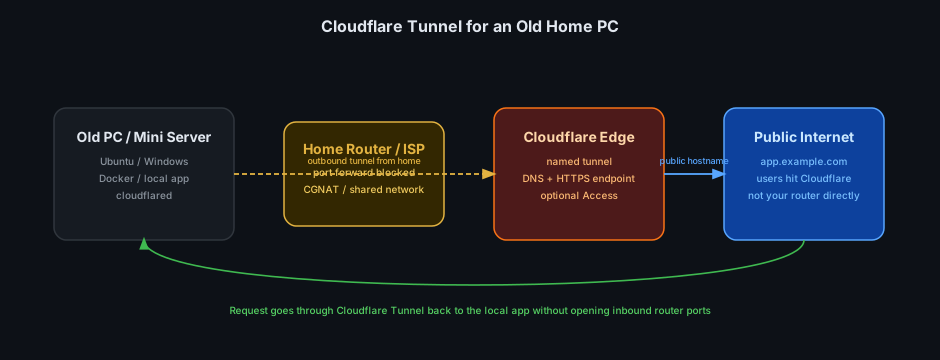
That is exactly where Cloudflare Tunnel becomes useful, because it does not require opening inbound ports into your home.
How Cloudflare Tunnel solves it
The core idea is simple:
- You install
cloudflaredon the old PC at home cloudflaredcreates an outbound connection to Cloudflare- Cloudflare accepts requests from the Internet
- Cloudflare forwards those requests through the tunnel to your local app
The big difference from port forwarding is:
- No need to open
80,443, or8080on the router - No need for your own public IP
- No dependence on whether the ISP allows inbound NAT
In other words, instead of the Internet knocking directly on your house, your machine reaches out first and keeps a stable tunnel alive.
Why it fits old PCs and mini servers so well
This is a perfect home-lab style use case:
- An old Dell OptiPlex in a corner
- A mini PC running Ubuntu
- An old Windows machine still good enough for a few services
- A spare laptop temporarily acting as a server
As long as that machine has outbound Internet access, you can publish web apps to your own domain even if your router cannot forward ports.
That matters a lot if you live in:
- An apartment building with centrally managed networking
- A dorm or shared office
- An ISP environment that blocks many ports
- A home setup with an ISP-locked router
What Cloudflare Tunnel is best at
Cloudflare Tunnel works especially well for:
- HTTP/HTTPS apps
- Internal dashboards
- Reverse proxying several web services
- Small personal sites or admin panels
Examples:
n8n.example.com-> n8n onlocalhost:5678git.example.com-> Gitea onlocalhost:3000home.example.com-> Home Assistant onlocalhost:8123
If your main goal is publishing web services, Tunnel is one of the cleanest ways to do it.
Important caveat: Cloudflare upload size limits
If your app accepts uploads, remember that Cloudflare enforces request body limits at the edge. According to the current Cloudflare documentation:
- Free: up to
100 MB - Pro: up to
100 MB - Business: up to
200 MB - Enterprise:
500+ MB
So if you turn an old PC into a public mini server for large uploads, you can easily hit 413 Payload Too Large. Tunnel is a great fit for dashboards, web apps, and small-to-medium uploads, but not a great fit for large video or multi-GB backup uploads through the default Cloudflare proxy path.
Where this works best
Cloudflare Tunnel is the best fit when you want to publish:
- a dashboard or web app
- a small admin panel
- a self-hosted service already running on
localhost:PORT
If the goal is exposing a full SMB share or your whole LAN, this is not the right tool.
The easiest setup path: use the Cloudflare dashboard
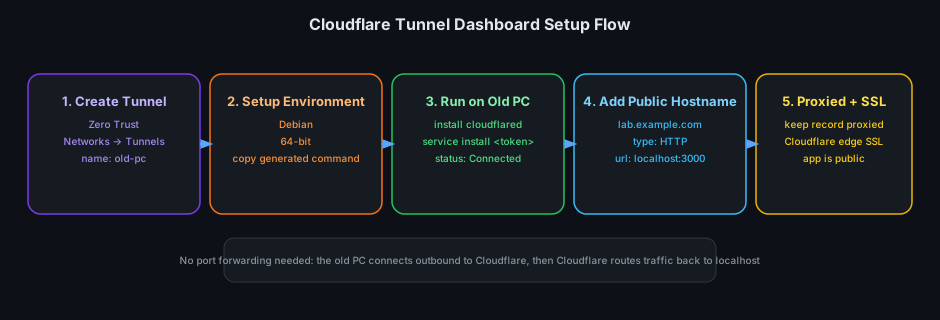
If this is your first time, just follow the Cloudflare web flow:
- Go to
Cloudflare Dashboard -> Zero Trust -> Networks -> Tunnels - Click
Create a tunnel - Give it a name such as
old-pc - In
Setup environment, chooseDebian+64-bitif the machine runs Ubuntu or Debian - Copy the command Cloudflare generates and run it on the old PC
For Debian 64-bit, it usually looks like this:
sudo mkdir -p --mode=0755 /usr/share/keyrings
curl -fsSL https://pkg.cloudflare.com/cloudflare-main.gpg \
  | sudo tee /usr/share/keyrings/cloudflare-main.gpg >/dev/null
echo 'deb [signed-by=/usr/share/keyrings/cloudflare-main.gpg] \
https://pkg.cloudflare.com/cloudflared any main' \
  | sudo tee /etc/apt/sources.list.d/cloudflared.list
sudo apt-get update && sudo apt-get install cloudflared
sudo cloudflared service install <TOKEN_FROM_THE_CLOUDFLARE_DASHBOARD>
That token comes directly from the Cloudflare website. Once the command finishes, the dashboard should show Connected. Click Continue.
Then add the public route in Add a public hostname or Add route -> Public application:
Subdomain: lab
Domain: example.com
Type: HTTP
URL: localhost:3000
Cloudflare will handle SSL at the edge, but the DNS record must stay Proxied. If you switch it to DNS only, the normal tunnel web-app flow will stop behaving the way you expect.
The simple pattern to remember is:
lab.example.com->localhost:3000panel.example.com->localhost:8080n8n.example.com->localhost:5678
Shortest possible flow
- Run the app locally on the old PC, for example
localhost:8080 - Create the tunnel in Cloudflare
- Choose
Debian+64-bit - Run
cloudflared service install <token> - Add the route / public application to the correct local port
- Make sure the hostname stays
Proxied
Once those 6 steps are done, the old PC is effectively a public mini server without traditional port forwarding.
If you only want to test quickly: Quick Tunnels
Yes for testing, no for a stable setup.
Cloudflare offers Quick Tunnels so you can expose an app temporarily without doing the full dashboard setup. But:
- The URL is usually temporary
- It is not ideal for long-lived use
- It is not the right foundation for a stable mini server
For homelab use or long-term public access from an old PC, use a named tunnel with your own domain.
Why this approach is worth using
- It does not depend on router port forwarding
- It makes old hardware useful again
- It works well with Docker, Nginx, or direct local apps
- You can add Cloudflare Access later if the app should not be fully public
Common mistakes
1. Thinking Tunnel replaces application security
Tunnel helps you publish apps without opening ports, but it does not fix weak authentication, default credentials, or a badly exposed admin panel.
2. Forgetting the 100 MB Cloudflare upload limit
Many people publish the app first and only later discover that large uploads fail with 413. If your use case depends on very large file uploads, Tunnel is not always the right path.
3. Publishing too many services at once
Only publish what genuinely needs to be public. Internal admin panels should often sit behind Access or at least strong authentication.
4. Treating Tunnel as full home-network exposure
Tunnel is excellent for apps. It is not the same as exposing your whole home subnet.
5. Not running it as a service
If you only run it in a terminal and close the session, the tunnel disappears. On a real server, run it as a service so it survives reboots.
Conclusion
If you have an old PC at home but cannot publish apps because your router cannot open ports, your ISP blocks inbound traffic, or you are stuck on a shared apartment network, Cloudflare Tunnel is one of the most practical solutions available.
It lets you turn old machines into public mini servers without traditional port forwarding. For web apps, dashboards, and small self-hosted services, it is one of the easiest ways to bring a homelab service online while keeping the home network setup relatively simple.