A very common setup: buy the domain somewhere else, manage DNS in Cloudflare
Many people buy domains from:
- Namecheap
- GoDaddy
- Porkbun
- PA Vietnam
- Mat Bao
- or any other registrar
and only later decide to use Cloudflare for DNS, the orange-cloud proxy, SSL, caching, or integrations with Tunnel, Nginx Proxy Manager, or a VPS.
The key point is:
- you do not need to move the registrar
- you only need to change the nameservers
- after that, Cloudflare becomes the place where you manage DNS
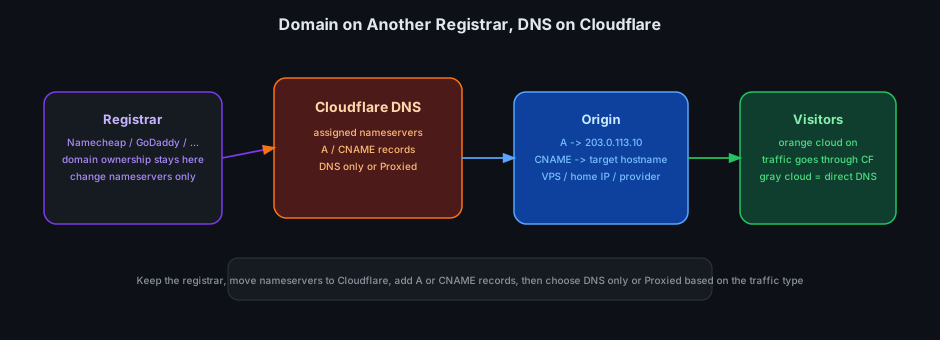
Why you need to change nameservers for Cloudflare DNS
When someone types example.com, the Internet has to ask the domain's nameservers:
- which IP is behind the domain
- where each subdomain points
- where mail records live
If the domain still uses the old registrar nameservers, Cloudflare is not yet authoritative for that DNS zone.
To use Cloudflare DNS fully, you must switch the domain's nameservers to the pair assigned by Cloudflare.
The correct flow for moving DNS to Cloudflare
The normal flow is:
- Add the domain to Cloudflare
- Let Cloudflare scan or manually add DNS records
- Get the two Cloudflare nameservers
- Log in to the registrar where you bought the domain
- Replace the old nameservers with the Cloudflare ones
- Wait until the domain becomes active in Cloudflare
The registrar still remains the place where you renew the domain. Cloudflare only becomes the authoritative DNS provider.
Step 1: Add the domain to Cloudflare
In the Cloudflare dashboard:
Add a domain / Onboard a domain
Enter the apex domain, for example:
example.com
Cloudflare creates the zone and usually tries to scan the current DNS records.
Step 2: Review DNS records before changing nameservers
This is the step many people skip.
Before you change nameservers, make sure Cloudflare already has the records you actually need, especially:
- the
Arecord for the apex domain - the
CNAMEorArecord forwww - any subdomains you actively use
MX,SPF,DKIM, andDMARCif email is involved
If you switch nameservers too early and the records are incomplete, the website or mail can break immediately after Cloudflare activates.
Step 3: Get the nameservers Cloudflare assigned
After adding the domain, Cloudflare shows the two nameservers assigned to that zone.
They look like:
lana.ns.cloudflare.com
mario.ns.cloudflare.com
Copy those exact two nameservers.
Step 4: Log in where you bought the domain and change the nameservers
Go back to the registrar and find:
Nameservers
or:
Custom nameservers
Replace the old nameservers with the two Cloudflare nameservers.
If the old setup has DNSSEC enabled, it is usually safer to disable DNSSEC first, switch nameservers, and only re-enable it after Cloudflare is fully active.
Step 5: Wait for Cloudflare to activate
After the nameserver change, Cloudflare needs time to verify it. Sometimes this is a few minutes, sometimes longer depending on the registrar and TTL.
Once active, DNS management moves to Cloudflare.
How to point a domain or subdomain to a VPS with A records or CNAMEs
For the most common setup, the rule is simple:
- if you have a destination IP -> use an
Arecord - if you have a destination hostname -> use a
CNAME
The next two sections cover those two cases.
Use an A record when you have a destination IP
An A record is used when you want the domain to point directly to an IPv4 address.
Example:
Type: A
Name: @
Content: 203.0.113.10
That means:
example.com -> 203.0.113.10
For a subdomain:
Type: A
Name: app
Content: 203.0.113.10
That means:
app.example.com -> 203.0.113.10
Use an A record when:
- you have your own VPS
- you have a public IP at home
- you have Nginx Proxy Manager or another reverse proxy on a fixed IP
Use a CNAME when you want to point to another hostname
A CNAME is used when the destination is another hostname instead of a raw IP.
Example:
Type: CNAME
Name: www
Content: example.com
That means:
www.example.com -> example.com
Or:
Type: CNAME
Name: blog
Content: ghs.googlehosted.com
Use a CNAME when:
- a third-party provider asks you to point a subdomain to their hostname
- you want
wwwto resolve to the apex domain - you want one subdomain to act as an alias for another hostname
DNS only vs Proxied: the most important Cloudflare distinction
This is the part most new Cloudflare users get wrong.
For A, AAAA, and CNAME records, Cloudflare lets you choose:
DNS only(gray cloud)Proxied(orange cloud)
DNS only
Cloudflare only answers the DNS query. The browser then goes directly to the origin IP or hostname.
Good for:
- mail-related records
- domain verification records
- services that should not or cannot go through Cloudflare's HTTP proxy
Proxied
Cloudflare sits between the visitor and your server. Web traffic goes through Cloudflare before reaching the origin.
Good for:
- public websites
- public web apps
- HTTP/HTTPS endpoints where you want SSL, WAF, caching, or some origin IP masking
When you should turn on the orange cloud
Enable Proxied when the record serves web traffic over HTTP or HTTPS.
Typical examples:
example.comwww.example.comapp.example.comblog.example.com
With the orange cloud on:
- Cloudflare can provide edge SSL
- the origin IP is less directly exposed
- you gain Cloudflare's web protection and performance features
When you should not turn on the orange cloud
Not every record should be proxied.
Keep DNS only for:
MXmail records- domain verification records
- some non-HTTP services
- hostnames where you need direct origin access for testing
If you are unsure, ask:
Is this record serving web traffic over HTTP or HTTPS?
If yes, Proxied is often correct. If not, DNS only is often safer.
A practical example
Imagine:
- a domain bought on Namecheap
- a VPS with IP
203.0.113.10 - the main app on
example.com - an admin panel on
panel.example.com
A reasonable setup would be:
- Add
example.comto Cloudflare - Copy the Cloudflare nameservers
- Change nameservers in Namecheap
- Create these records:
A    @       203.0.113.10     Proxied
A    panel   203.0.113.10     Proxied
CNAME www    example.com      Proxied
Then:
example.comopens the main appwww.example.comaliases back to the apexpanel.example.comopens the admin panel on the same server
The most common mistakes
1. Changing nameservers but forgetting to create the records in Cloudflare
The result is usually NXDOMAIN or a broken site right after Cloudflare becomes active.
2. Turning on Proxied for records that should not be proxied
This can easily break mail or some specialized services.
3. Pointing to the wrong IP
One wrong digit is enough to send the domain to the wrong server. Always double-check the origin IP.
4. Forgetting www
Many people create only the apex @ record and forget a www record, so www.example.com stops working.
5. Forgetting DNSSEC during the nameserver move
If DNSSEC was enabled on the old setup, a careless nameserver switch can break DNS resolution.
Conclusion
If your domain was bought somewhere else, the cleanest Cloudflare setup is usually:
- keep the same registrar
- move nameservers to Cloudflare
- manage DNS from Cloudflare
- use
Arecords when you have an IP - use
CNAMErecords when you need to point to another hostname - enable
Proxiedfor web traffic that should go through the orange cloud
This is the foundation you need before moving on to Cloudflare Tunnel, Nginx Proxy Manager, a VPS, or any public app using your own domain.